How to set up a guest network
When someone comes to visit, you may get the question “What’s your WiFi password?” A secure internet connection is essential, and while you may not mind giving your guests access to your WiFi network, you do have a second option that can keep your network more secure and private: a guest network.
Why use a guest WiFi network?
Did you know that if your guest’s phone or computer were to be impacted by a virus or cyberattack while on your network, then it could put your own devices at risk? Creating a second secure WiFi network (a guest WiFi network) provides a layer of protection for your home network by allowing guests to connect to the internet without impacting your personal network and your own devices.
Setting up a guest WiFi network
Setting up a guest WiFi network involves logging into your router’s settings interface and changing some network preferences. Follow these step-by-step instructions to set up a guest WiFi network:
- While connected to your home WiFi network, open a web browser and type http://192.168.0.1 into the URL field. This will bring you to your modem/router settings portal.
- Log in to your secure portal using your admin username and password. These are printed on the sticker that is usually affixed to the side or bottom of your router.
- Once logged in, select the Wireless Setup icon from the menu.
The next steps will depend on which Brightspeed modem you have.
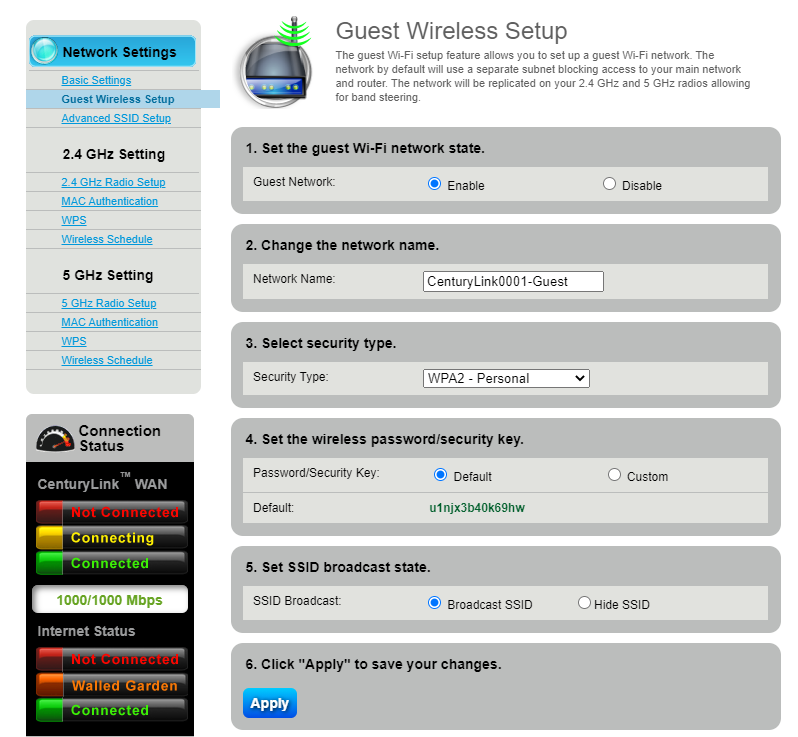
- Select “Guest Wireless Setup” in the left sidebar menu.
- Under step 1, select “Enable.”
- Under steps 2-3, enter a name for your guest network. Tip: No spaces can be included in the network name. Then set the security type (for most users, you will want to choose “WPA2 – Personal”).
- Under step 4, you can choose to use the default password, or to set your own custom password (recommended). Finally, select “Broadcast SSID” under step 5 to make the new network visible.
- Select “Apply” to save your changes.
You can view and print your guest network information in the box at the bottom of the screen.

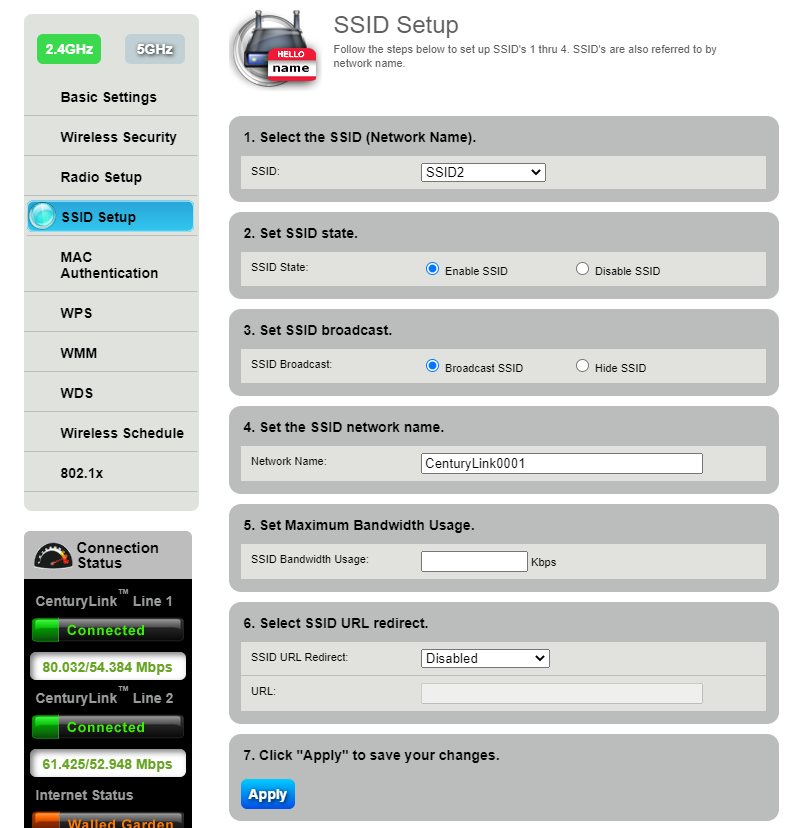
- Select “SSID Setup” in the left sidebar menu. If you have a dual-frequency router, you’ll need to select either 2.4 GHz or 5 GHz on the left side, depending on which band you want to set up your guest network.
- Your primary network should appear at the top of the SSID dropdown list. Choose SSID2 to set up a second network.
- Select “Enable” to turn the network on. Depending on your model of router, you may also see “Broadcast” as an option – select this to make the network visible to guests.
- Choose a customized and easily recognizable SSID name for the network. Tip: No spaces can be included in the network name.
If your model has a step 5 and 6, these are optional if you wish to set a bandwidth limit or a redirect (advanced users).
- Select “Apply” to save your changes.
Setting your guest WiFi password
Just as you set a custom password for your personal WiFi, you will also want to also create a strong, unique password for your guest network. This is the password you will share with visitors to let them use your WiFi. If you have a C4000 series gateway, you can do this right in the “Guest Wireless Setup” screen. If you have a tower or box-style Brightspeed modem, then you’ll need to take a few final steps to create your guest WiFi password:
- After following the steps above, while still logged into the router’s Wireless Setup menu, select "Wireless Security" in the left sidebar.
- From the SSID drop-down list, select the name of the new network that you just created in the previous section.
- Set the security type. Most will select WPA2; read more about security types.
- On the same screen, you can type in your custom password. Be sure to choose a different password from your primary network.
- Select “Apply” to save your changes.
Using a guest network for smart home devices
Do you have smart devices in your home, such as a smart TV, smart speaker, etc.? You may want to consider using a guest network when connecting your smart home devices. The reason this may be a good idea is that if any of your smart home devices were to get hacked, the data available to the hacker would be limited to the devices on that particular network. Therefore, the guest network would shield other devices, such as laptops and smartphones, that are connected to your primary WiFi network.
Discover other useful guides and tips from the Brightspeed Support Center.
Brightspeed services support